Showing posts with label feature. Show all posts

Saturday, February 03, 2007

Arbitrary Prim Attributes

What a super idea! I've got the YAYZERAMA HANDS too now!!

Features like this (and other cool things, too!) could be added to the viewer client, 'specially now that it's open source, but so many features require just a little bit of help from the server to do it properly.

For example, right now there's no good way for the sim to remember "This prim has a saturation of 0.5 on all its sides" and tell that to everybody that comes by, so there isn't any way to share the desaturated goodness with anyone else! (Maybe you could store some cryptic data in the prim's name or description for other special viewers to notice, but that would be a dirty, dirty hack. Yuck!)

Sure, we could tug on the Linden programmers' shirt tails every time there's a new client-side feature we'd like the sim to store a little bit of data for. But, even if they were just twiddling their thumbs all day and waiting for something to do, there would never be enough time to add something for every feature that someone thinks up. (Plus they'd have to do a grid-wide update every 15 minutes.)

A better way would be to give each prim a little pocket where it can hold some arbitrary data to give to viewers that see it. There would be a hard limit on the size of the data (maybe 1k, or 5k), and it would be completely up to the viewer software to decide what to do with it. And of course, scripts would have to be able to read and write this data!

Ideally, objects and prims in SL should be sent as XML, kinda like this:

<primitive 
name="My Awesome Prim"
description="The best prim ever made."
shape="torus"
texture_uuid="top: [uuid], bottom: [uuid]"
contents="[first_item_uuid], [second_item_uuid]"
size="8m 2m 2m"
skew="80%"
awesomeness="23.5" />
Then the scripts could do something like this:
if( llGetAttribute( "shape" ) == "torus" )
{
llSetAttribute( "awesomeness", "infinity" );
}
Or if we had a decent scripting language, like ruby, it would be like this:
if self.shape == "torus"
self.awesomeness = "infinity"
end
And if you had a special viewer client that was programmed to understand the "awesomeness" attribute, the client could do something cool like write "This prim is so awesome!!" on your screen with a big squiggly arrow pointing to it.

That would be awesome.

P.S. If you're worried that this would contribute to sim load because of the increased amount of data being sent, remember that textures are the #1 cause of teen pregnancy sim lag. Plus, the sim could enforce a data size for the prim declaration, by dropping out some nonstandard attributes if it gets too big.

P.P.S. Yeah, I know this could be a big ol' security hole. What isn't? 'specially if you're using a custom viewer client provided by some homeless person down the street.

Wednesday, January 10, 2007

Miscellaneous Feature Ideas

Just brainstorming features (large and small) that would be both possible and desirable to add to the Second Life viewer client. Things which would require server changes don't fit here, only things which can be accomplished by changing the client only. I'm also focusing only on new features for this post; I might make another post of bugs that should be fixed.

  • Menu items for builder tools (e.g. Edit Linked Parts, Ruler Modes, Color/Texture Pickers).
  • Hide/show specific UI elements. (Tateru gets the credit for thinking up this one.)
  • Arbitrary number of clothing layers on all body sections.
  • Improved avatar mesh UV maps, so clothing and skins are easier to create and align.
  • Improved avatar mesh weighting, so joints don't bend in such an ugly way.
  • Modifiable menus (rearrange and set shortcuts on the fly).
  • UI color schemes.
  • Additional image file formats (e.g. PNG).
  • Client-side script API, allowing interpreted scripts to access client functions.
Here's how I would rank them:

The three least difficult to accomplish, in increasing difficulty:
  1. Menu items for builder tools.
  2. Hide/show UI elements.
  3. Improved avatar mesh weighting.
The three most beneficial, in decreasing benefit:
  1. Client-side script API.
  2. Arbitrary clothing layers.
  3. Modifiable menus.
The three best time investments (most gain for time spent), in decreasing return on investment:
  1. Client-side script API. (The gain is simply astounding.)
  2. Menu items for builder tools. (The gain is only moderate, but the effort is minimal.)
  3. Arbitrary clothing layers. (The gain is very great.)
If you care to comment on how you would rank the listed items differently, please do so. I'm not asking for new ideas for features, though; I think there are more appropriate (and worthwhile) channels to be heard.

Sunday, December 17, 2006

Rolling Your Own Menu

Jacek's secret herbs and spices

Have you ever wanted to gather all your favorite and most-used items from Second Life's main menus, and put them all in one place for easy access? Well, you can do exactly that by editing SL's XUI files!

For my own purposes, made a new sub-menu, Builder Tool, which lives under the Tools main menu. In it, I put lots of useful building tools and options that I took from various other menus. Now I can tear off one little menu, and have them close at hand while working! Yay!

I also added two new menu items, for options found in the Edit tool window: Stretch Both Sides and Stretch Textures! Because they are now menu entries instead of checkboxes in the Edit window, I can assign keyboard shortcut keys to toggle them! Double-Yay!

Rather than walk through every step of editing the XML, I'll just point out the important or new things. All the editing is done in menu_viewer.xml, the same file we editted to change the keyboard shortcuts before, but I also referred to floater_tools.xml, as described later in this post.

Creating a new menu is fairly easy: just make (or duplicate and modify) a <menu> block, being careful (of course) to close the block with a </menu> tag. Gathering items from other menus is a simple matter, just copy and pasting each desired <menu_item_*> block into the middle of your new menu block. From what I can tell, the positioning attributes (bottom, left, etc.) are ignored or overridden by SL, so you don't even have to worry about getting those numbers right.

Adding the two new menu items, Stretch Both Sides and Stretch Textures, was not much harder. But in fact, it is only possible because of the particular way that those two options, along with the Snap to Grid/Use Grid option, were implemented; I suspect that they were all once menu items in the past, or were intended to be so. Snap to Grid currently is a menu item in the Tools menu, and it was by examining the XML for the menu item and comparing it to the corresponding checkbox in the Edit window that I discovered that it was possible to do the same with the other two options.

The key is that all three of these options are manipulated by calling the ToggleControl function and passing the control name of the option. Both the menu and the checkbox refer to the SnapEnabled control name: in floater_tools.xml, the Use Grid checkbox has an attribute, control_name="SnapEnabled"; in menu_viewer.xml, the Snap to Grid item has two lines which mention SnapEnabled, once in an <on_click> tag, and once in an <on_check> tag.

Making the two new menu items was just a matter of looking up their control names (ScaleUniform and ScaleStretchTextures) in floater_tools.xml, and plugging them into copies of the Snap to Grid menu item definition in both lines (be sure to change the text labels to be descriptive of their new functions).

Doing a quick grep of the XML files, there are a handful of other miscellanious options which have control_names. This suggests to me that menus could be built to change these too. Some notable example uses are: (un)muting audio; the Copy Selection tool; toggling chat bubbles; toggling avatar names above their heads.

It may also be possible to change other options which are not simple on/off switches. For example, it just might be possible to make a menu item which changes all the render detail settings and draw distance to the minimum, for dealing with crowded areas.

Unfortunately, this dependence on knowing the option's control name means that this method does not allow us to add an "Edit Linked Parts" menu item—the checkbox in the Edit window does not refer to any control name. I still hope that it can be added somehow, but for now it's up to the Lindens.

Happy building!

Wednesday, December 06, 2006

My XUI Wishlist

There are specific things that I want to accomplish which drive me to poke my nose in SL's XML User Interface (XUI) definitions.

Here are the ones I have already accomplished:

  1. Customize some menu shortcuts.
  2. Rename "Hole Size" to "Thickness".
  3. Decripple Transparency.
Here are the things I want to accomplish, but are probably impossible through XUI-editing alone:
  1. Define keyboard shortcuts to toggle "Edit Linked Parts" and "Stretch Both Sides".
  2. Move the color and texture eyedroppers/pipettes from the Color/Texture Selection windows to the Toolbox's Texture panel, next to the swatches.
  3. Decripple the prim attributes.
  4. In particular, be able to edit the Profile Cut attribute for Box, Cylinder, and Prism.
I have already tried #2, performing a simple copyandpastectomy of the pipette button from the Color Selection window to the Texture panel, but the button was nonfunctional/disabled. I suspect that the Toolbox window does not have the proper function(s), or is not programmed to listen for clicks to that button. Likewise for #1: the button tag may not respond to shortcut attributes as the menu items did.

#3 and the more specific #4 appear to be impossible because the functionality involved in limiting, adjusting, and hiding various attributes based on prim type is programmed into the SL viewer, and is not part of the XML. To be able to coax the Profile Cut attribute to appear for Boxes, I would probably need access to SL's source code; of course, I do not have access to the source code, so this seems to be out of my hands.

Decrippling the UI

Ok, so I changed the Second Life XML User Interface files to change some text labels and names in the Toolbox (Edit window). This was just a simple matter of reading through the floater_tools.xml file and changing a few words here and there. No biggie. (No, I did not add a new prim type!—I just renamed "Sphere" to "Watermelon". It's much nicer, don't you think?)

But aside from the obvious comedic value, what can changing the UI do for us?

Here's a good one, the true poster child of useful UI changes: we can decripple the Texture panel's "Transparency" input form. Have you noticed that you can only make an object 90% transparent using the UI, but you can make it 100% transparent with a single function call in a script? Linden Lab crippled the UI, perhaps to prevent new Residents from making hundreds of totally invisible prims and forgetting where they put them.

Well, if you are capable enough to edit SL's UI definitions, you are experienced enough to toss aside that crutch! Please note that the same disclaimer as my earlier post also applies here—you are doing this at your own risk! Here's how: in floater_tools.xml, search for the string ColorTrans. That should take you to a <spinner> tag defining the spinner (a numeric entry form with up/down arrows on the side) that controls transparency. That tag has an attribute, max_val, which defines the highest number you are allowed to put in it. Change that number from 90 to 100. While you are at it, change the increment attribute to something more useful, like 5 or 10; now it will increase by that amount whenever you click the up/down arrows on the spinner (or use your mousewheel ← bonus pro tip for you!). The default value of 2 gives you a good degree of precision, at the expense of convenience. Don't forget that you can always just click on it and type in whatever number you want, when you need precision!

Now start (or restart) SL, and enjoy your newfound freedom!

Tuesday, December 05, 2006

IM IN UR XML IMPROVIN UR INTERFACEZ


(Write-up and useful changes to XUI tomorrow.)

Thursday, November 23, 2006

Unheavenly Bodies

The sun and moon in Second Life are unrealistic and just plain ugly.

That's right, I said it. I went there. Ugly!

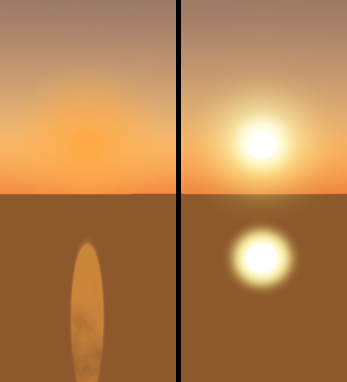
Figure A.


As I see it, there are three main problems with Second Life's sun and moon:
  1. Their reflections on water stretch unrealistically.
  2. They sometimes appear as dark or darker than the sky around them.
  3. Background stars are drawn in front of them.
Examine Figure A; the left half is raw, untouched snapshot of a near-sunset in SL at 300m; the right half is what I think it should look like. (NB: the bottom of the reflection is partially obscured by clouds.) Both problems 1 and 2 are in full force here.

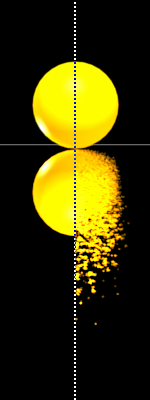
Figure B.

Optics minilesson #1: In the real world, a reflection of the sun or moon on the water appears stretched because of small irregularities (i.e. ripples) on the surface of the water which change the angle at which light is reflected. You can see this in Figure B, a test image I rendered in Blender using raytraced reflections. The image shows a lit sphere resting on a perfectly reflective surface. On the left side, the mirror is completely smooth; note that no stretching occurs in the reflection. On the right side, however, the mirror has small ripples which affect the angle of reflection, causing the same type of stretching seen in the real world.

My graphics card is not powerful enough to enable fancy water, so I, like many Residents, simply see an upside down and yuckily stretched version of the sun or moon in the water. I know the programmer who did that meant well—he or she just wanted to make it look as if there were ripples distorting the reflection. But all it accomplished was making it look like the Grid is a concave Discworld.

Optics Minilesson #2: In the real world, the sun can never appear as dark or darker than the surrounding sky for the simple reason that the brightness of the sky is due to partial scattering of the light from the sun. Most of the light from the sun passes through the atmosphere without much scattering, which is why the sun appears to be a circle with definite edges, rather than a vague patch of brightness.

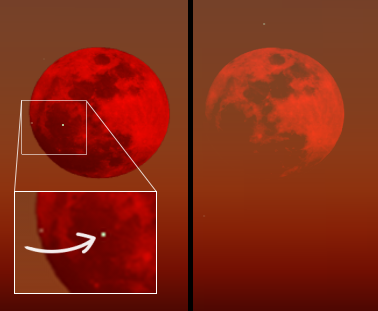
Figure C.

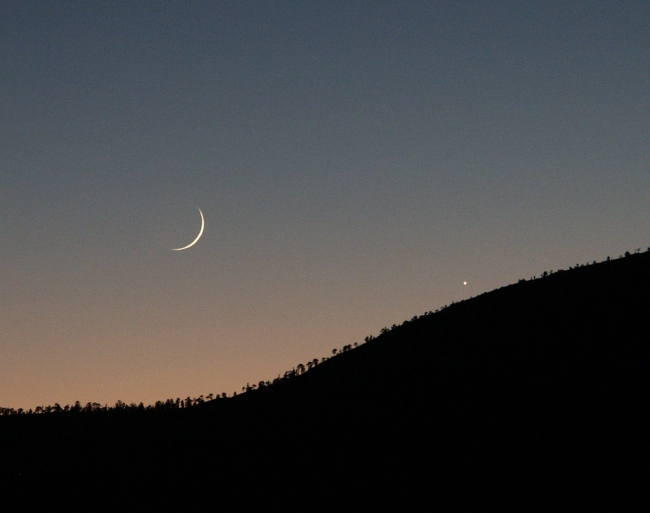
Optics Minilesson #3: The moon, too, will always appear at least as bright as the sky around it, never darker (as it does in the left half of Figure C). This is especially obvious on days when the moon is visible during the early morning or late afternoon; the unlit parts of the moon, which would appear black at night, appear the color of the sky.

Why does this occur, when mountains and skyscrapers do appear dark against the sky? Quite simply, because mountains and skyscrapers block the scattered light from the sky. The moon, because it is outside the atmosphere, does not block it.

Also note in Figure C the star appearing in front of the moon. That's just crazy.

Saturday, November 04, 2006

Chat Range

There is still one more part of Color Curves yet to be written, but it requires significant research and development into methods of algorithmically generating intermediary control points between the two blended colors, taking into account neighboring control points. (For the transition between two curves to be visually smooth, it must be continuous, which means that the end point and the control points on either side must be collinear, i.e. they are all in a straight line.)

But that is a post for another day. Today's post requires much less education in maths to understand. The topic: chat ranges!

Right now, avatars have two options for range when it comes to speaking: you can speak normally, in which case anyone (and anything) within 20m of you will hear you; or, you can shout, in which case the range is increased to 100m.

Scripted objects have one additional option, designed to reduce the noise in the chat channel: they can whisper, which carries for only 10m. (Avatars cannot whisper, only scripted objects.)

Being the person that I am, this limitation is dissatisfying to me. What if I want to have a conversation around a dinner table, without disturbing (or being overheard) by the group at the neighboring tables? Or what if I am teaching in a 60m-wide lecture hall, and I want even the students in the back to hear me—but I don't want to bother the people out in the lobby, who are 80m away?

Even if avatars had the whisper option made available to them, the granularity of three choices of range—10m, 20m, or 100m—is unsatisfactory. There are too many situations where something in between (or smaller) is needed.

In some situations, you can work around this with scripted objects. If you need a smaller range, you can attach an object to your avatar which listens for your chat on a hidden channel, and whispers it into chat for you (thus emulating a whisper option for avatars). If you need a range between 20m and 100m, you can set up scripted relay objects, like small intercomm systems which listen to chat in one place, broadcast it on a hidden channel, and then repeat any broadcasts it receives into chat. Both of these solutions are suboptimal.

"Alright, Jacek. Get to the point. Tell us your solution," you say? Oh rude and belligerent imaginary reader, I was just about to tell you!

The solution is this: on the chat bar, in lieu of the "Shout" button, we should have a numeric input box, into which we can type the desired range of our chat. This setting would remain in effect until the next time you changed it; a checkbox toggle in Preferences would determine whether the setting is saved across sessions of SL.

This renders the shout and whisper actions obsolete for the most part, but they do offer something useful which the proposed solution, as presented thus far, lacks: by appearing to other users as "Jacek Antonelli shouts: Yay! Candy!! \o/" or "Considerate Vendorbot whispers: Your purchase of 'Xcite! Interactive Torus Attachment' will be delivered soon.", they convey important information about the range of the chat, and who else can hear it.

It would be simple enough to automatically label chat as whisper, normal, or shout based on range (anything <=10m is whisper, anything >=50m is shout, for example). But we can do so much better—let's let the user define custom ranges and labels for their own chat!

This would be a new tab of the Preferences window. In it, you could define "rules" for determining what label chat will be given, based on range. An example rule might be something like this: >25m, <51m: "calls out". After defining that rule, anything I said with a range greater than 25m but less than 51m would appear like, "Jacek Antonelli calls out: CANNONBALL!! *splash*".

The other logical alternative would be for each user to define rules to label *incoming* chat based on range, rather than labelling their own *outgoing* chat for other people to see. I prefer the latter for its roleplay possibilities (you can easily establish a "personality" for your avatar based on how you label what you say), but the former would offer more uniformity in what each user sees (you won't have to figure out what the heck so-and-so meant when they "burbledummed" bad jokes at everybody in the room). For the best of both worlds, checkbox preferences for "accept chat labels from other users" and "apply custom labels to incoming chat" could be offered to let each user decide.

There is one more aspect of this feature proposal: remap the Ctrl-Enter keyboard command to send chat with a user-defined range. This way, users could decide whether Ctrl-Enter should send chat with a wide range (like the current Shout action does), a normal range, or a short range. Sending chat with Ctrl-Enter would not reset the range for other chat, so you could use it for those times when you want to send one or two lines of chat at a different range than the rest of your conversation. (For example, you are talking to your date across the dinner table, but you want to call out a song request with a normal chat range, then continue whispering sweet nothings.)

Sunday, October 29, 2006

Curves: Color (Part 2)

Attention: Maths ahead! Non-geeks may prefer to avoid the equations, and just look at the pretty colors instead.

Previously, on Jacek Writes: our hero introduced the topic of smoothly blending between two colors algorithmically.

Linear blend from red to blue.
Last time, I defined an equation for blending linearly between two color vectors a and b as time, t, increases from 0 to 1:

line(t, a, b) = a + t * (b - a)

After a little algebra, we can rewrite that function as:

line(t, a, b) = (1-t)(a) + bt

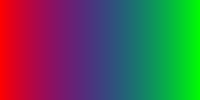
Linear blending looks just fine for blending between two colors, as demonstrated above. Starting from the left, we progress from red to blue, passing through magenta and purples. Looks pretty good, right?

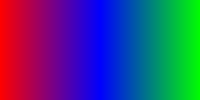
Linear blend from red to blue to green.
The problem arises when we try to add a third color, blending from a to b, then from b to c. As you can see, there is a "spike" at the point where we reach pure blue. To use a spatial analogy, we are driving from point A to point B, then taking a hard right turn and going to point C; it's the spot that we take the turn that ruins the smoothness.

But there are other techniques besides linear blending, which can solve this discontinuity. The technique that I prefer (for its versatility) is Bézier curve blending.

For the uninitiated, Bézier curves are a beautiful and elegant mathematical technique for modelling smooth curves like those used in graphic and industrial design. They are closely related to NURBS (Non-Uniform Rational B-Splines) Surfaces, a modelling technique popular among computer animators for producing smooth, organic shapes. (Although, NURBS surfaces have somewhat fallen out of use in favor of other techniques like Catmull-Clark subdivision surfaces.)

Bézier curves have several properties which are important for our purposes: 1) they are smooth, 2) they are not difficult to compute, and 3) each curve can be defined through a small number of control points, or "knots".

Based on viewing the wonderful animated diagrams on Wikipedia, I set about reverse-engineering Bézier curves. (Sure, I could just find an equation on the web somewhere, but where's the fun in that?)

What I find so elegant about Bézier curves is that the equation can be a fractal, recursively defined. Using our linear blend function defined above, we can define a quadratic Bézier curve which passes through points a and c, with a control point b:

quad(t, a, b, c) = line( t, line(t, a, b), line(t, b, c) )

That may make a mathematician's lips quiver with joy at its simplicity and elegance (especially if you then use that function to define a cubic Bézier curve, as I will do next time), but it has certain redundancies when it comes to evaluating it with a computer (i.e. it takes more separate mathematical operations than necessary).

So, I got out my pencil and pad and expanded the equations by hand, combining terms and simplifying, then using that equation to write an equation for a cubic Bézier curve. In fact, I did so in four different ways (only two of which were novel in the fact that they contained algebra errors so foolish that they would embarrass an English major).

My final equation for a quadratic Bézier curve is as follows:

quad(t, a, b, c) = (1 - t)2(a) + (1 - t)(2bt) + ct2


Quadratic Bézier blend with red, blue, and green control points.
Using this equation to blend between three colors produces the image seen here. As you can see, it is definitely very smooth; it has solved the problem we saw with the linear blend, the spike when we reached blue and make a hard right towards green.

But there is a problem.

It never hits pure blue.

It gets close, there in the middle. We pass near blue. We are definitely in Blue County, Color-ado.

But we never actually see pure blue!!


Have Bézier curves failed our hero? Is this the end?!? Don't miss the shocking conclusion next time, Issue #1397: Crossed Controls & Cubic Curves --JA


Sunday, October 22, 2006

Curves: Color

I wrote a post about "section radius" recently, which involved drawing curves with a discreet number of anchor points. The application there was a more robust replacement for the Taper attribute of prims. Of course, the usefulness of using a curve instead of one or two numbers is not limited to Taper alone—there are innumerable other uses for them, completely aside from the Object attributes.

One of my backburner obsessions for the past few months has been color. (No surprise there, given that I'm currently enrolled in a color theory class, I suppose.) In particular and with regard to SL, two aspects have been on my mind. The first is using a base color as input to an algorithm to generate related colors (lighter tint, darker shade, blue-shifted, red-shifted, visual complement...). The second is blending between two colors in a smooth and visual appealing fashion.

This is where curves come in.

You see, colors can be represented in a computer program as multidimensional vectors, usually 3-vectors: the x component corresponds to the intensity of the red color channel, the y to the green, and the z to the blue. For example, [1.0, 0.0, 0.0] is pure red, [0.8, 0.5, 0.0] is an orangey color, [1.0, 1.0, 1.0] is pure white, and [0.0, 0.0, 0.0] is pure black.* (In additive color models, such as light, the presence of all colors is white. In subtractive color models, such as pigment or paint, the presence of all colors is black, at least theoretically; in practice, mixing all your paint colors together usually makes a grayish brown.)

* NB: for convenience, I am denoting vectors with square brackets, [ ], instead of the usual angled brackets, < >, which are also used to denote HTML tags, causing the silly Blogger software to interpret my vectors as malformed HTML code. Yes, I am too lazy to search-replace them with the symbol codes.

So suppose we want to blend between, say, [1.0, 0.0, 0.0] red and [0.0, 0.0, 1.0] blue. The simplest way to do this would be a straight linear blend. Since positions in space, like colors, can be represented as 3-vectors, a linear blend is equivalent to moving in a straight line from point A to point B.

We could write an algorithm thusly, with a being the starting color/point, b being the ending point, and t being a number between 0.0 and 1.0, representing our progress moving from a to b (e.g. t = 0.5 means we are exactly halfway between the two; t = 0.25 means we are ¼ of the total distance from a, and so ¾ of the distance from b):

line(t, a, b) = a + t * (b - a)
Here are some sample points using our algorithm to blend between red and blue:
line(0.00, [1,0,0], [0,0,1]) = [1.00, 0.00, 0.00]
line(0.25, [1,0,0], [0,0,1]) = [0.75, 0.00, 0.25]
line(0.50, [1,0,0], [0,0,1]) = [0.50, 0.00, 0.50]
line(0.75, [1,0,0], [0,0,1]) = [0.25, 0.00, 0.75]
line(1.00, [1,0,0], [0,0,1]) = [0.00, 0.00, 1.00]


To be ct'd in Issue #452: Pierre Bézier and Paul de Casteljau unite once more in... O What a Twisted Curve We Weave!! Don't miss it, gang!
  --JA


Thursday, September 28, 2006

Linux Users Love Tofu Linden!

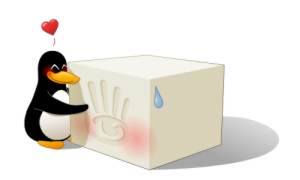
A cartoon penguin hugging a brick of tofu imprinted with the Second Life logo.
Yes, every Linux-using Resident of Second Life is now brimming over with love and affection for Tofu Linden, the Linux client developer for Linden Lab!

Today marks the first time the Linux client has had any sort of file upload/download capacity! Right now it's pretty rough around the edges, as there is still no file browser/picker, but it works! (Just rename the image to upload.tga and place it in your SecondLife/your_name/ folder, then use the upload menu item.) Tofu tells us that the file picker is in the works, which is also very nifty!

Since the last I posted about the Linux client, much progress has taken place, apparently due to the efforts of our hero, Tofu Linden! Audio playback was added August 29, including support for parcel audio streams, and Copy & Paste was added September 13—the Linux client is fast approaching the full feature set that the Windows and Mac users currently enjoy (plus, of course, the added "feature" of being able to log in to SL in Linux!).

I have found my own way to express my appreciation to Tofu: I created the adorable image above, featuring a penguin lovingly embracing a brick of tofu! (The image was created in Inkscape, by the way—a great piece of software if ever there was one!)

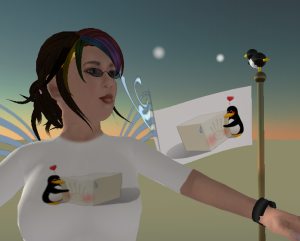
Action shot of the T-shirt.I then successfully uploaded the image, and a T-shirt featuring the image, to Second Life! Then I took a snapshot of me wearing the shirt (and standing in front of a waving flexi flag with the texture on it) and saved the snapshot to disk—you can see the proof here!
Since everybody should be able to show their love for Tofu Linden, I am giving out the shirt and textures* at my home/studio/gallery in Hallasan! (While you are there, say hi to Primmy!)

* A small word of caution, though: my gallery is in a Mature sim, and includes a few artistic nudes. You probably won't even see them if you go straight to those coordinates and don't poke around, but I thought I'd give you fair warning, in case you are logging in to SL while at work. In the Vatican. Where you share an office with his Holiness the Pope.

Friday, September 22, 2006

Section Radius

What I'm proposing here is fairly radical, in that it represents a very different method of building in Second Life. But, like everything I propose, it is not only possible, but feasible; I could devise the algorithm for it myself, with a bit of research as needed. This feature would require a more significant change to the data structure for prims than before, but the possibilities are astounding.

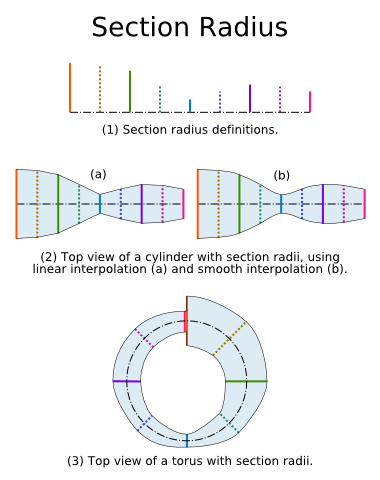
Throw away the Taper attribute for objects. It was great, but it will be made entirely obsolete by the feature I am proposing: section radii. Instead of describing the relative size of the beginning and end of the prim, as Taper does, Section Radius would describe the size of the prim at every point along its path.

NB: Every prim, with the exception of Sphere, can be represented as a two-dimensional shape such as a square or circle, which is extruded along a path to create a three-dimensional surface. For Box, Cylinder, and Prism, that path is a straight line into the third dimension; for Tube, Torus, and Ring, that path is a circle.

Take a look at my fancy diagram (to the right, click for a larger version). In (1), we are describing 5 different sections (solid lines), with another 4 values being interpolated between them (dotted lines). The gray line at the bottom represents the full span of the path from beginning to end.

In (2), we see a top-view of a cylinder with the sections that were defined in (1). Note that by smoothly interpolating between the defined sections, we can achieve a very smooth result without defining a large number of sections. In (3), we see a top-view of a torus with the same sections (or, at least, a passable representation of one; it's hand-drawn, not mathematically computed, so it may not be very accurate).

In the example, all the sections were equally spaced, but that need not be the case. Nor need there be a set number of sections. An arbitrary number of sections could be defined, with data storage increasing linearly with the number of sections defined (i.e. if we define twice as many sections, it takes twice as much space to store the data).

The advantage taper has is that it can be represented as two numbers between -1.0 and +1.0, one number for each axis X and Y. So, it doesn't take much bandwidth to transmit the Taper attribute of a prim. The disadvantage to taper is that its possibilities are decidedly limited: the shape's size can only be changed by a constant value as it is extruded along its path. It cannot, for example, start out small, become large in the middle, then small again at the end (making a surface resembling a lemon or American football).

With section radius, on the other hand, it would be possible to make such a shape, and a great many other shapes, with a single prim: vases, bullets, wavy french fries, bushy tails, barbells, and a great many non-PG items (which I will refrain from linking to). I haven't even started to mention all the possibilities with torus and kin!

There is, of course, a trade-off: section radius takes more information to store and transmit than taper. How much more?

One axis of taper requires, at most, a single floating point number (i.e. not an integer). If Linden Lab is clever, they don't even need that, because the granularity of each attribute is in the hundredths (I may be wrong, it may be thousandths), meaning there are only 200 (or 2000) possible values for one taper axis. That would take only 8 (or 11) bits to represent, versus a 32 bit float value.

Section radius, on the other hand, would require at least twice that, for every section defined. The more sections you define (i.e. the greater the detail in the section radius), the more data you have to store. I say "at least twice", because additional storage would be needed for storing the interpolation type (linear, smooth, step, and perhaps others). That might be stored once for the entire curve, or stored for each section. The latter would require more storage, but would be more flexible.

Section radius can, of course, be used to emulate the current Taper attribute (as well as the poorly-named Hole Size attributes for torus and kin, at no extra cost): one section each defined at the beginning and end, with linear interpolation between them. That's between four and six times as much data, for the same result.

When it's phrased like that, it seems like a bad idea. The same result, but a higher cost? No thanks!

But consider this: section radius would enable shapes which were impossible before. And if you were to try to approximate such a shape using existing building methods, it would require (n-1) separate prims, where n is the number of sections. Each prim, of course, has to store a great many redundant attributes (position, rotation, size, texture data, etc.) which would not be necessary for a single complex prim. And besides taking more storage space (not to mention parcel prim limit space), a many-prim solution would require a great deal of time to construct, and the results would be blocky and undesirable.

To put this in another light: section radius would enable complex and beautiful shapes to be made from a single prim, but would make creating a large number of simple shapes slightly less efficient.

It represents a shift from low-level, difficult-to-use tools to higher-level, easy-to-use tools. This is a shift that Second Life needs to make, in many areas, if it hopes to attract and retain the Doers and Makers that create the content of Second Life.

Sunday, September 10, 2006

Build Window: Particles

The Build window should have a tab for controlling a prim's particle system.

That's simple enough, yeah? But I like to hear myself type, so I'll go into more detail.

Right now, the only way to activate on deactivate particle systems on a prim is through the use of a script which calls the llParticleSystem() function. That function takes a list of many pairs of parameters, each pair describing what is being defined (e.g. PSYS_PART_START_COLOR, i.e. particle starting color) and what that thing is being defined as (e.g. <1,0,0>, i.e. pure red). Constructing such a list is a tedious and frustrating task, but fortunately there are plenty of helpful scripts which can make it a bit more convenient. But even these helper scripts must call llParticleSystem() eventually, or there will be no particles.

You might think, based on the fact that a script is the only way to activate particles, that a prim must necessarily be scripted to have particles. This is not the case: the particle system is stored with the prim itself, not the script. Consider the fact that you can stop or even delete the script which activated the particles, and the particles will continue unabated.

To summarize, particle systems can exist without scripts, but there is currently no method aside from scripts to turn them on or off. As scripts are a tedious and ultimately unnecessary way of creating, changing, and deleting a particle system, it thus stands to reason that a more convenient method should be provided as a supplement to the scripted method. The Build window's Features tab (which currently houses the settings for flexible paths and light-emission) seems to be the natural place for this. But particles have a lot of settings, and the Features tab is already a bit crowded, so, at risk of over-complicating the user interface, I recommend branching the Features tab into sub-tabs, one of which would be dedicated to particle systems.

(In fact, particle systems have such a large number of settings that two or more tabs may have to be dedicated to particle systems. An obvious but imperfect division is between PSYS_PART_* and PSYS_SRC_* flags. A more natural but less clear-cut division is between settings which define the appearance of each particle, and those which define how they are emitted and behave as a system.)

So what would we see when we look at the Particle tab(s) of the Build window? It turns out that particle system settings are represented by a handful of distinct types of data, and the proper UI widgets to control each type are already used in other places in Second Life's interface, especially in the Build window itself:

typewidgetexample
bitfieldcheckboxesGeneral tab: permissions
optionradio buttons /
drop-down menu
General tab: for sale options /
General tab: When Left Clicked
floatnumeric controlObject tab: Revolutions
integernumeric controlObject tab: Hollow
vectormultiple numeric controlsObject tab: Position
colorcolor pickerTexture tab: Color
texturetexture pickerTexture tab: Texture
object/avatarobject pickerReport Abuse window

Some notes: in the script, colors are actually the vector data type, but it is non-intuitive to select a color the same way you set e.g. size in a graphical widget. Also, a script has the advantage in selecting a client asset texture by key, whereas the graphical widget can only select from inventory. And, the object picker in the Report Abuse window can only select the root prim of an object, which would be insufficient when targetting a child prim of an object.

In addition to all the particle system attributes, one more UI element would be needed: a checkbox for whether the particle system is currently active or not. But unchecking that box should not make in impossible to change the other settings, as happens with the flexi and light features (in fact, it should not do so in those cases either!). This might require a small change to the way particle systems work, as I am not certain if non-active particle systems are saved with prims. But even if the values for the attributes of a non-active particle system were stored only client side (so that if the client crashed, they would be lost), it would still be a useful feature.

I feel compelled here to anticipate several possible arguments against this feature:
  1. "Newbies and griefers will be making ugly and annoying particle systems left and right! At least now, you have to be able to script to abuse particle systems!"

    To this I have two responses. Firstly, newbies and griefers already make ugly and annoying particle systems left and right, because scripted smoke bombs etc. are already easily available. Secondly, I don't think that imagined fear of abuse is a legitimate reason to prevent progress in ease of legitimate use.

  2. "This change would put the makers of particle helper scripts out of business!"

    Adapt or perish. Should we have stuck with the telehub system, because point-to-point teleporting forced vehicle makers to change their business models? Perhaps we should get rid of the Object tab, and force all changes to a prim's shape be made through scripts, to increase demand in the prim-twisting script market?

    The fact is, scripts which control particle systems will still be useful; but they will have to go beyond the basics and have more complex behavior. Some examples include particle systems which gradually rotate through all the colors with time, or particle systems which detect nearby avatars, look up their favorite color in a database, and shoot particles of that color at them.

As I see it, there are plenty of reasons to add this feature and few reasons to reject this feature, little effort required to add it and much benefit from its addition. So get it done.

Sunday, September 03, 2006

Procedural Textures

This post appeared originally on the old blog. The original comments attached to the post are listed at the bottom. -J 09/03/06

Textures take a long time to download, even on the asset servers' good days. The fact is, they use a lot more storage space and bandwidth than the actual prims they cover. While moderately-sized textures will weight in at several kilobytes, a prim takes perhaps a hundred bytes (the exact figure does not matter at this point, only its relative magnitude). How can a three-dimensional object take less space to store than a two-dimensional image?

The trick is in how prims are created. Every single prim is parametric' or procedurally generated. Second Life has functions (i.e., procedures) which take certain parameters (e.g., size, twist, taper) and generate the three-dimensional mesh of, say, a torus based on those parameters. So you don't have to transfer the 3D mesh, just the parameters; the mesh can be constructed by any client locally.

Textures, on the other hand, store pixel data for the image. Of course, image compression is used, and varying levels of detail are generated (so you only have to transfer the lowest level of detail needed), but it still requires much more data than a prim.

But, just like it is possible to procedurally generate 3D primitives, it is possible to generate 2D images, i.e. procedural textures. Procedural textures are common in 3D computer animation as an easy and storage-inexpensive way of creating high-detail textures. Most animation packages come with a number of texture procedures, and although the complexity of the procedures varies, they all have something in common: one procedure can generate a (seemingly) unlimited number of similar (but not identical) textures, based on the procedure's parameters. In addition to the "standard" texture procedures which come with the program, many packages allow knowledgeable users to create their own procedures.

(To avoid confusion, I will use the terms "texture procedures" or "procedures" to indicate blocks of code which are executed to generate a texture, and "textures" to indicate collection of image data, either from an uploaded image or the saved result of a texture procedure.)

Consider a "wood-grain" texture procedure . Some of the parameters it might have are: wood color, grain color, ring density, ring uniformity (how similar in thickness each ring is), ring noise (how distorted the ring shape is), and so on. Based on these parameters, the procedure would generate a texture. If you used slightly different parameter settings, the procedure would generate a slightly different texture.

If I Ruled the Grid, there would be several standard texture procedures written in a simple 'shading' language (affecting surface color only; control over how light affects the surface would be excessive for Second Life). Eventually, custom procedures could be written by users and distributed through Second Life as objects.

Some examples of standard texture procedures would be:

  • multiple-octave Perlin noise (or similar)
  • wood grain
  • stone/marble
  • text
Standard texture procedures, which would be distributed with the client software, present a much simpler problem because everyone will already have the procedures on their computer. Custom procedures complicate the system, because they must be distributed across the net to other clients, but the IP rights of the creator must be respected. (Distributing the procedure code, even in compiled form, increases the risk of it being decompiled or reverse engineered.)

To allow the creators of texture procedures control over the use of their creations (making possible a market for procedures), special permission settings would be required, as detailed below. Unless otherwise noted, each setting can be enabled or disabled separately for creator, owner, group, everyone, etc.:
  • Modify: user can access and modify the procedure's source code.
  • Run: user can set parameters and execute the procedure.
  • Save: user can save the results of the procedure as a texture in his/her inventory.
    • Save Permissions: saved results will be created with these mod/copy/transfer permissions.
  • Download: user can download the compiled procedure to the client. If this is disabled, only cached server results can be seen.
  • Copy, Transfer: as with other types of object.

Obviously, some uses of custom texture procedures do not take advantage of the reduced bandwidth use of procedural textures; instead, they are used as a convenient way for the creator to generate many customized textures, which can then be used separately. The ability of texture procedures to create many textures with minimal human effort is no less useful than its bandwidth conservation.


Comments from the original post:
Akela Talamasca said...

Thank you for explaining the whole 'pocedural' thing... since the advent of Spore, there's been a lot of talk about 'procedurally generated animation' and the like, and I've never understood what it meant, and why it was able to provide suce small file sizes. Now I know. And knowing's half the battle. *GI Joooooeeeeeeee!*

8/31/2006 9:47 AM

Friday, August 18, 2006

Object Clones

This post appeared originally on the old blog. The original comments attached to the post are listed at the bottom. -J 09/03/06

Suppose for a moment that you are a builder of detailed houses within Second Life. In a typical house, you might have ten window fixtures, eight decorative columns, four doors, and two statues in the garden. Each of these items is identical to the others of its type, and is constructed of, perhaps, ten prims each, with the exception of the statues which are 100 prims each.

You've just spent 420 prims of your parcel budget to make twenty-four objects, and we haven't even added furniture! That's 420 prims which must be saved to the sim, and 420 prims which must be sent to every Second Life client which wants to view your magnificent houses.

What a waste, when each item is exactly the same as the others of its type, with only a different position, rotation, and possibly scale!

With object clones, which I am herein proposing, you could build the exact same house, but the above-mentioned 420-prim figure would be reduced to a mere 130 prims.

At this point, some of you will think I have gone insane, but the clever among you will have deduced how this could be possible and are now bubbling over with glee at the prospect. For the benefit of those who don't yet see it, I will explain.

An "object clone" would be a special object which has no prims of its own; instead, it inherits prims from the original object. This means that instead of storing the details of ten window fixtures, you store the details of one window fixture, and then create nine clones, saying, "These nine objects are constructed exactly like the first one."

From a technical perspective, object clones are a simple form of lossless data compression. Rather than storing n identical sets of data, we store one set and n-1 additional references to that set. The compression rate becomes more dramatic as the number of duplicates increases. (I think object clones would constitute a type of dictionary coding, but I may be wrong on that.)

Because a clone only has to store a reference (the UUID of the original) and a transformation matrix (position, rotation, and scale), it takes considerably less data storage space than even a single prim (which must also store such things as texture information and prim parameters).

But, even if Linden Lab counted each reference as equivalent to one prim for the purposes of parcel limits, we could still reduce our example of 420 prims to 130 prims + 20 clones = 150 'prims'.

Clearly, this feature would be of incredible importance to builders of all types! Frankly, it is such a simple concept with such extraordinarily far-reaching benefit that I find it hard to believe that Linden Lab hasn't already thought to implement it.

I have in mind several extensions to this concept which would further revolutionize the way we build in Second Life, but this post is already lengthy, so I will save them for another day.


Comments from the original post:
Alexander Lapointe said...

Mindgasmic!

Wow, what a wonderful idea! I'm not a regular builder at the moment, but even with the making of Trav Doll/Trav Hat this would have been useful and would have cut down the prims to 8 from 11, which isn't that big of a difference, but still....

Plus, it would be nice for owners of small parcels with low prim limits, *cough* *cough*, by allowing for the little extras that make home-owning wonderful. Or the possiblity of having a house and a skybox that one could use.

8/24/2006 8:48 PM


Thursday, August 17, 2006

Flexible prim scale adjustment

This post appeared originally on the old blog. The original comments attached to the post are listed at the bottom. -J 09/03/06

When it comes to flexible prims, size does matter. A small prim just won't bend as much as a larger prim with the same flex settings. So if you want your lop-eared pet rabbit's ears to lop just the right way, you may have to scale him up to 5 meters on a side!

If I ruled the Grid, flex would be independent of size. Depending on how Linden Lab has implemented flexible paths, this would likely involve subdividing the path into the same number of parts when it is big as when it is small—that is, a number of subdivisions per path, not per meter of the path's length.

Since flexible prims have already been implemented, and that change would "break" a huge number of existing objects (not to mention cause plenty of embarrassment for flexi-skirt users who go without the luxury of "glitch pants"), Linden Lab could instead add a new attribute to control the scale used for subdividing the path. The default setting would be equivalent to the current scale, so that existing flexible prims would not behave differently.


Comments from the original post:
Reina Quine said...

Go ahead and break 'em! Serves those hussies right for not wearing glitch pants!

8/17/2006 7:34 AM